
Welcome to the Martyr-Dome (free pattern)
If you follow my work, you’ll probably know I enjoy watching movies. And for me, nothing provides the perfect escape from reality like a hefty movie marathon – unless, of course, it’s a hefty movie marathon steeped in even heftier religious plot lines! Last month, that’s just what I did: over the course of a few weeks, I undertook the arduous task of watching an array of distinguished religious epics such as The Passion of Joan of Arc, Jesus Christ Superstar, The Devils, King of Kings and The Last Temptation of Christ, among others.
I was on or around the fourth movie in five days, sitting in my recliner crocheting and watching a crucified Willem Dafoe blink back Karo syrup blood tears, when a thought occurred to me. For as uncomfortable as they look, and as fake as they might seem, there is one essential religious costume prop that is actually pretty attractive, fashionable, and — dare I say it — sexy:
The crown of thorns.

Willem Dafoe lookin’ bloody good in The Last Temptation of Christ (1988)

The Passion of Joan of Arc (1928) — beautiful, yes, but you don’t have to cry about it

Leave it to Rolling Stone magazine to make a messiah out of a molehill

King of Kings’ couture bling ring: Stephane Rolland runway show.

Fab cinephile tranny Peaches Christ gets thorny with it.
See? Sexy.
So instead of wondering, “Oh death, where are thy thorns?” I threw up my hands and said, “Breezy lies the head that wears a crown,” and set about making a new pattern, which I share with you all here today.
Ladles and Gentlebugs, I present the fully crocheted, D.I.Y. Crown of Thorns!

Let’s face it: some days are better than others. For those times when the sins of the world hang heavy on your shoulders, simply whip up this torturously simple project and feel a sting of pride from your handmade crowning achievement.
D.I.Y. CROWN OF THORNS
Pattern: ©2014 Shove Mink / Photos: ©2014 Chuck McNary
Please, for the love of all that’s good and slightly holy, don’t distribute or sell this pattern, or sell finished products made from this pattern — because after all, I don’t come into YOUR temple and knock over YOUR money changing tables, do I?

 MATERIALS
- “F” and “B” crochet hooks
- Worsted weight yarn in light brown
- DK weight yarn in dark brown and dark red
- 6 – 10 red plastic beads or small crystals
- Wire
- Yarn needle
- Fabric glue
PATTERN
Branches (make 2)
With light brown worsted and “F” hook:
Sc 6 in magic ring (or ch 2, sc 6 in 2nd ch from hook).
Rounds 1 – 135. sc 6 (or repeat to reach required length needed to wrap around head comfortably.)
Bind off and leave tail.
Insert length of wire to fit fully into both branches. Weave the two branches together around each other as shown below.  Form into a circle, fitting around scalp and flattening front to sit on forehead “comfortably.” Wrap ends tightly around each other and sew the beginning closed end to branches along the open end.
  Thorns (make 24-30)
With dark brown DK and “B” hook:
Sc 4 in magic ring (or ch 2, sc 4 in 2nd ch from hook).
Rounds 1 – 2. sc 4
Round 3. [Inc, sc 1] twice – 6
Bind off and leave tail.
Sew each thorn to branches as shown in the photos, or however randomly you’d like.
Blood streams (make 3-5)
With dark red DK and “B” hook:
Leaving a long tail at the beginning, ch 9, 12, or 16.
Row 1. Hdc in 2nd chain from hook, sc 1, sl st, sc in next 5 (8, 12).
Bind off and weave in end tail.
Using fabric glue, attach red crystals or beads to either side of “drop” (on the hdc). 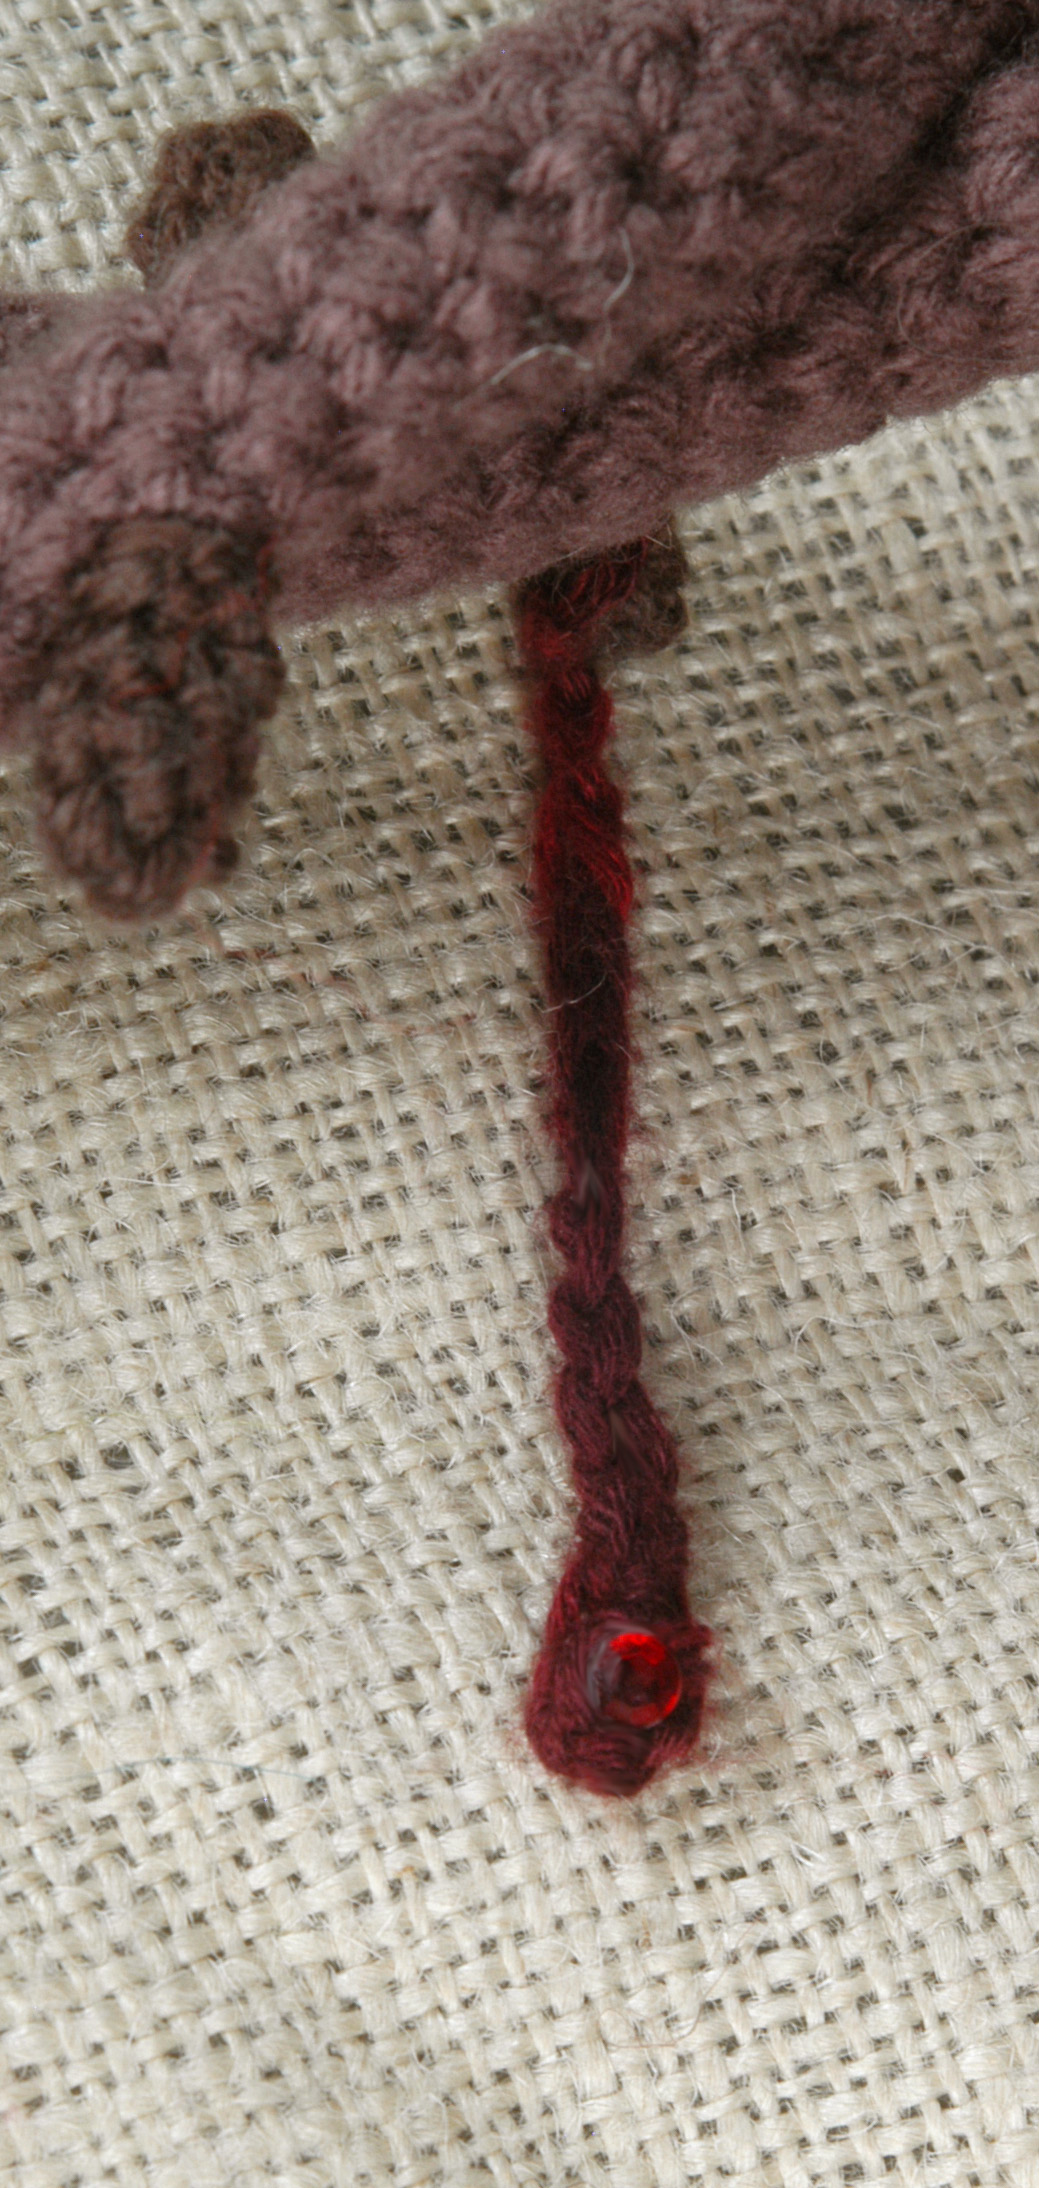 Use beginning tail to attach to inside of bottom thorn and branch, as shown below.
  Once completed, fix that cushy coronet atop your glowing pate and go about your day, fielding all those sharp-tongued compliments from enthused passersby that are sure to be flung your way like arrows! This would also make a great last-minute bonnet replacement for an Easter egg hunt, the perfect addition to your Sunday best, or a stunning accoutrement for the upcoming junior or senior prom.
Make one just for yourself, or a whole bunch for the family — the more, the martyr-ier! 
And remember, even when life hands you lemons…
To Boldly Go Where No Hook Has Gone Before
Exciting news, everyone! My Spock Ears pattern is featured in the newly released book The Star Trek Craft Book: Make it So! now available through Pocket Books, a division of Simon & Schuster.

You can buy it on Amazon, Barnes and Noble, or preferably, through your local brick and mortar book store. Trust me, they need your support!
Although I haven’t gotten a chance to flip through a physical copy yet, I can guarantee it will be a treat for both Trekkies and crafters alike — particularly crafting Trekkies! They really get to experience the Best of Both Worlds, if you know what I mean…
Thanks, everyone!
Digging Your Own Grave: A Free Pattern
Getting into a scary-looking costume, wearing massive amounts of theatrical makeup, smearing blood all over yourself and scaring the living shit out of people is a damn good time indeed. It’s also what I call a Tuesday. But because Halloween is (possibly) the one day of the year that I can step outside and be myself knowing I won’t be harassed or have trash thrown at me, I still have a soft spot in my heart for the old girl.
So what better way to commemorate the festival of Samhain than to give all my readers a free pattern in celebration of that most wonderful time of the year? Yes, yes, there’s always the oh-so-spooky neo-tradition of donning a skin-tight “sexy” maid or cat outfit and drunkenly vomiting in public… but we all know an Antigurumi crochet pattern is much more satisfactory, right? Uhh… right?
Putting the “fun” back in “funeral” and the “me” back in cemetery, I present to you…
GRAVEYARN!*

©2012 Shove Mink / Photos: Chuck McNary
*Feel free to make these as decorations, costume embellishments, or as gifts to friends — but please, please, please!! For the love of all that’s hallowed, do not sell or distribute this pattern or sell finished products made from the pattern. (I swear it will haunt you to the grave — the real, final, stone one.)
MATERIALS:
- Size “F” (3.75mm) crochet hook
- Worsted weight yarn in light grey, brown, green, and off-white
- Felt in dark grey
- Cardboard
- Fabric glue
- Sharp scissors
- Tapestry or yarn needle
- Tracing paper and pencil
- Stuffing
ABBREVIATIONS:
ch – chain
dc – double crochet
hdc – half double crochet
rnd – round
rs – right side
sc – single crochet
st – stitch
ws – wrong side
yo – yarn over
SPECIAL STITCHES:
Popcorn (Pop): Make 3 dc in the same st. Drop loop from hook, insert hook from front to back into first dc made, pull loop through and ch 1.
Reverse Popcorn (RevPop): Make 3 dc in same stitch, drop loop from hook, insert hook from back to front into first dc made, pull loop through and ch 1.
Loop stitch (Loop st): Insert hook into st and form a loop of yarn around your finger. Moving over the front and around the back of nearest facing side of the loop, grab the farthest facing side of loop with your hook and pull through st (2 loops on hook), yo and pull through both. (Confused much? The effervescent June Gilbank of Planet June has an excellent loop stitch video tutorial available here, which is much easier to understand than written directions.)
PATTERN:
TOMBSTONE (make 2)
With light grey:
On one of the tombstones, leave about a foot-long tail before chaining.
Ch 11.
Row 1. Sc into 2nd ch from hook and continue to end – 10
Rows 2-12. Ch 1, turn, sc 10 across
Rows 13-14. Ch 2 (counts as first hdc), turn. hdc 1, dc 2, tr 2, dc 2, hdc 2.
Bind off and weave in all ends EXCEPT the foot-long beginning tail. Holding both parts of tombstone together, use beginning tail to sew together along sides and top, leaving bottom open.
Trace tombstone shape (along the interior of seam) onto cardboard, cut out and place inside tombstone opening.
Cut out the letters “RIP” from dark grey felt and glue to front of tombstone.
DIRT AND LAWN
With brown:
Ch 14.
Row 1 (rs). Dc in 4th ch from hook, dc in next, pop, dc 3, pop, dc 3.
Row 2. Ch 3 (counts as first dc), turn, RevPop, dc 3, RevPop, dc 3, RevPop, dc in top of turning ch.
Row 3. Ch 3, turn, dc 2, pop, dc 3. pop, dc 3.
Rows 4-9. Repeat rows 2 and 3.
Do not bind off.
Attach green yarn with rs facing up and towards you.
Row 7. Ch 1, but do NOT turn. Sc 1 in each st around both sides and top, making 3 sc in each corner.
Row 8 (ws). Ch 1, turn, and loop st around, making 3 loop st in each corner.
Row 9. Ch 1 and turn. Holding loops down, sc around, making 3 sc in each corner.
Rows 10-11. Repeat rows 8 and 9.
Bind off, weaving in ends of green yarn and leaving tail of brown yarn.
Take brown tail and sew tombstone bottom (through both sides) against the open end of dirt.
Snip loops and trim to give the lawn a grassier look.
ARM
With off-white:
Sc 6 in magic ring (or ch 2, sc 6 in 2nd ch from hook).
Rnds 1-10. sc 6
Stuff and bind off, leaving tail.
FINGERS
Attach off-white yarn to round 1 of arm, then:
[Ch 5, turn, sc 4, sl st in next st] 3 times, then sl st in st below on rnd 2, sl st in next st, ch 4, turn, sc 3, sl st in next st.
Bind off and weave in ends.
Take arm tail and attach open end to the middle upper side of the dirt.

To build a teeny yarn cemetery, make multiple graves and sew them together along the sides with green yarn.

THE END!
If you need additional angles for reference, more Graveyarn photos can be found at my Flickr page here.
Don’t forget to keep the holiday safe! Go out at night in pairs. Keep away from gang colors. Don’t buy masks from the Silver Shamrock Novelties Company. And make sure to take those razor blades out of the Snickers bars BEFORE giving them to trick-or-treaters.
And above all… have a HAPPY, JOYOUS HALLOWEEN!
I know I will.

Bring in the Spring with a Ring!

Since the Easter/Eostre/Ishtar time festivities are almost upon us, I thought I’d remind “peeps” about the Bunny Ring pattern and tutorial I posted here last year. It’s an easy pattern and very quick to make, so feel free to make a bunch, stick them in those plastic egg thingies and hide them in the grass for all those tiny Easter hunters and gatherers in your life. (Just make sure your pets don’t eat them; trust me, they’ll try.)
Pattern is found here: BUNNY RING
Aaaand the tutorial video is here (WARNING: contains mild expletives, heavy sarcasm, and myriad views of my hideous man-hands):
Rashes are Red, Violence is Blue, Here’s A Free Gory Pattern Just For You!
Oh goody goody gummy bears! It’s almost February, and that means Valentine’s Day! YAAAAYYYYY!!!
EVERYBODY LOVES VALENTINE’S DAY!!!
Oh, wait… no they don’t.
In fact, there are more than a few people out there who feel that February 14th is nothing more than a big sham designed to make singles feel like crap and keep greeting card companies in business. Keeping these folks in mind, this year I decided to come up with my own Valentine’s Day greeting to make and share with the ones you love… or loathe.

If you’re tired of getting the same old “Oh, I love it!” or “How incredibly sweet!” upon gifting your sweetums their usual, mass-produced Valentine, sit back and watch the lovely look of confusion strain their face when you plop this little sucker into their lap. Maybe you’ll even get a sexy lower lip quiver or a tear-filled eye in the process. HOT!
 This little fellow works up pretty quickly, is crocheted back and forth (as opposed to rounds), and requires only a scrap amount of yarn .
Download the pattern PDF here!
Wishing you a Very Logical New Year
Well folks, 2012 is now upon us!
I don’t know about you, but when I was a kid in the 1980s the 21st century sounded like some still-distant science fiction dream world our planet might never get to. I thought for sure we’d all be flying around in Jetsons cars by now, sending our holographic images into our friends’ living rooms and pushing on our retinas to watch embedded television. Well, the future is now, and I can’t say we’re too far off from all that, but the technological realities our modern age has come up with are pretty impressive and mind-boggling.
Or at least they would be… if Star Trek hadn’t come up with them first.

While we might not be traversing far-off galaxies, transporting ourselves onto to Klingon spaceships, or shuffling off to the holodeck for exasperating Sherlock Holmes RPGs, many of the objects people use today — cell phones, video conferencing, GPS devices, stun guns — were predicted by Star Trek many decades ago.
Well, Christmas has come and gone and you’ve already gotten all the fancy stun guns and tricorders and communicators your heart could desire, so why not try out some of that fabulous Star Trek fashion sense with my pattern for crocheted Spock Ears?

These little cuties will show off your nerdly Trekkie fanboy/girl status while also keeping your ears toasty warm! It’s a really quick little project that works up in under a half hour.
SPOCK EARS
©2011 Shove Mink
The pattern is worked continuously in the round until row 11 (after which you will work back and forth). While an F hook was used for my particular ear size, you may have to go up or down a hook size to get a proper fit for yourself.
MATERIALS:
“F” hook
Worsted weight yarn in “flesh” color (Spock beige, Sarek tan, or Tuvok brown)
Scissors
Tapestry needle
ABBREVIATIONS:
ch – chain
sc – single crochet
sk – skip
st(s) – stitch(es)
inc – increase
PATTERN: (make 2 ears)
Sc 6 in magic ring or double loop.
Round 1-2: sc 6
Round 3: [sc 1, inc] 3 times (9)
Round 4-5: sc 9
Round 6: [sc 2, inc] 3 times (12)
Round 7-8: sc 12
Round 9: [sc 3, inc] 3 times (15)
Round 10: sc 15
Row 11: sc 8
Row 12-14: ch 1, turn, sc 8 across
Row 15: sk 1st st, sc in next 7 sts (7)
Row 16: sk 1st st, sc in next 6 sts (6)
Row 17: sk 1st st, sc in next 5 sts (5)
Row 18. sk 1st st, sc in next st, sk next st, sc in next 2 sts (3)
Row 19: sk 1st st, sc in next 2 sts (2)
Row 20: sk 1st st, sc in next st (1)
Bind off and weave in tail.
Place “point” opening (after row 11) over the top of your ear and fold the bottom flap formed by the decreases on row 18 under your ear lobe.

If you want to get “authentic” (aka psychotic) with the look like I did, you can cut your hair into a sassy banged ‘do, shave the ends of your eyebrows off, fabric glue some gold rick-rack to the sleeves of a $5 Goodwill sweater, and ROCK OUT WITH YOUR SPOCK OUT!!

Hope everyone lives long and prospers in 2012!
New Pattern: Twinkerball!
Well, it’s official. I’ve caught the pattern-writing bug!
I’ve loved to write, draw and publish zines for most of my life, so making patterns doesn’t really seem too far off. The organization, illustration and writing of instructions can be time-consuming, but once you get the hang of the layout and pattern “language”, it’s totally fun!
So without further ado I proudly introduce my latest for-sale pattern,
TWINKERBALL THE CELEBRITY PUP!

You may recognize Twinkerball from her previous croshame.com appearance, cradled in the arms of socialite owner Cairo Sheraton. Well now YOU too can own this highly-sought after paparazzi pup with this simple and fun pattern!
Easy enough for a beginner, the 5-page PDF pattern provides both written instructions and photo illustrations. All that is required for the project is worsted-weight yarn in light tan, pink and yellow; 14mm safety eyes; stuffing; black embroidery thread; and a small bit of blush and a cotton swab. (As well as the usual “F”/3.75mm crochet hook, yarn needle, and scissors.)

You can scoop up little Twinkerball’s pattern over at the Croshame.com Ravelry store or over at the Etsy store!
Oh and by the way, the PIZZA PIE GUY pattern price has been “sliced” to $5! 🙂
HAPPY PATTERNING!
The Bunny Ring: A pattern and tutorial!
HOPPY EASTER EVERYONE!!
Nothing says Easter Sunday like some Silly Pink Bunnies, so in celebration of the season I’ve created my first Croshame pattern, a Bunny Ring!

The written pattern can be found here: BUNNY RING PATTERN
To go along with the pattern, I’ve created a little video accompaniment! (The pattern is in there somewhere, I swear.)
It’s my first venture into both the pattern-writing and video tutorial arenas, so they might be a little rough around the frayed, stained edges — but in the end, it’s all bunny love, baby. That, and some 20+ hours of editing. Enjoy!
